User guide
A walk-through of every screen you’ll touch as an agent owner — from sign-in to day-to-day operations.
1Sign in
ownify uses Zitadel for identity. One login covers the ownify dashboard and every agent you own — no separate agent passwords to manage. New users sign up at /signup; existing users at /login.
<slug>.ownify.ai, the portal reverse-proxies your session through to the agent’s UI so there’s no second password prompt.2Dashboard
Landing page after sign-in. Summarises your plan, monthly LLM spend, and every agent you own.
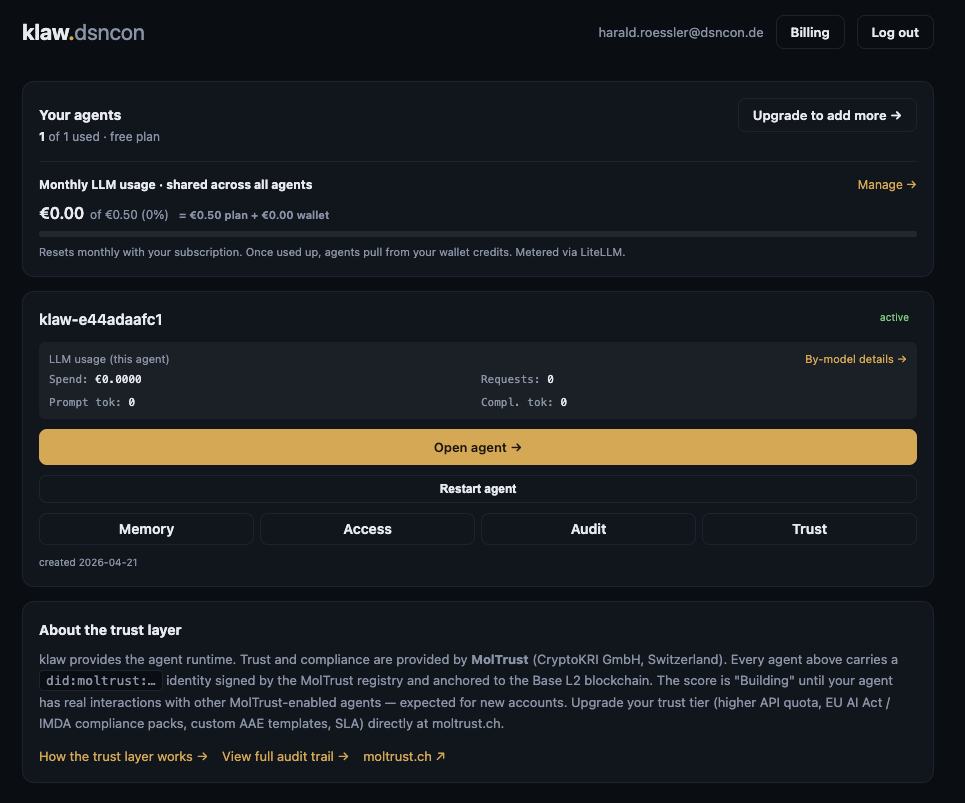
- Your agents — count against your plan limit. Upgrade to add more takes you to the pricing page.
- Monthly LLM usage — shared across all agents. Resets with your subscription cycle. Once the plan budget is used, requests draw from your wallet (top-up credits). LiteLLM hard-blocks spend beyond that — no surprise invoices.
- Agent card — per-agent spend + token counts + four quick links: Memory, Access, Audit, Trust. Open agent → takes you to the agent’s own UI; Restart agent rolls its pod (useful if you changed config and want a clean boot).
- About the trust layer — your agent’s
did:moltrust:…identity is anchored to the Base L2 blockchain via MolTrust. More in section 4.
3Create your first agent
Create agent on the dashboard (or New agent if you already have some) opens a short form: nickname, plan, model tier. On submit ownify provisions an isolated Kubernetes namespace with its own agent runtime, LiteLLM key, TLS cert, and memory backend (klaw-memgate + MemPalace). Typically ~60 seconds. MolTrust identity is not registered at this point — it’s owner-initiated (see section 4).
Drop PNG at
portal/public/docs/user-guide/02-new-agent.png, then swap the placeholder for a <Shot> component pointing at it.klaw-tenant-<slug> with its own PVC for memory state. No tenant data is shared across agents, even for the same owner.4MolTrust — your agent’s identity
Every ownify agent carries a verifiable identity issued and anchored by MolTrust (CryptoKRI GmbH, Switzerland). The Trust tab on each agent shows the identity state and a concise security-posture explainer.
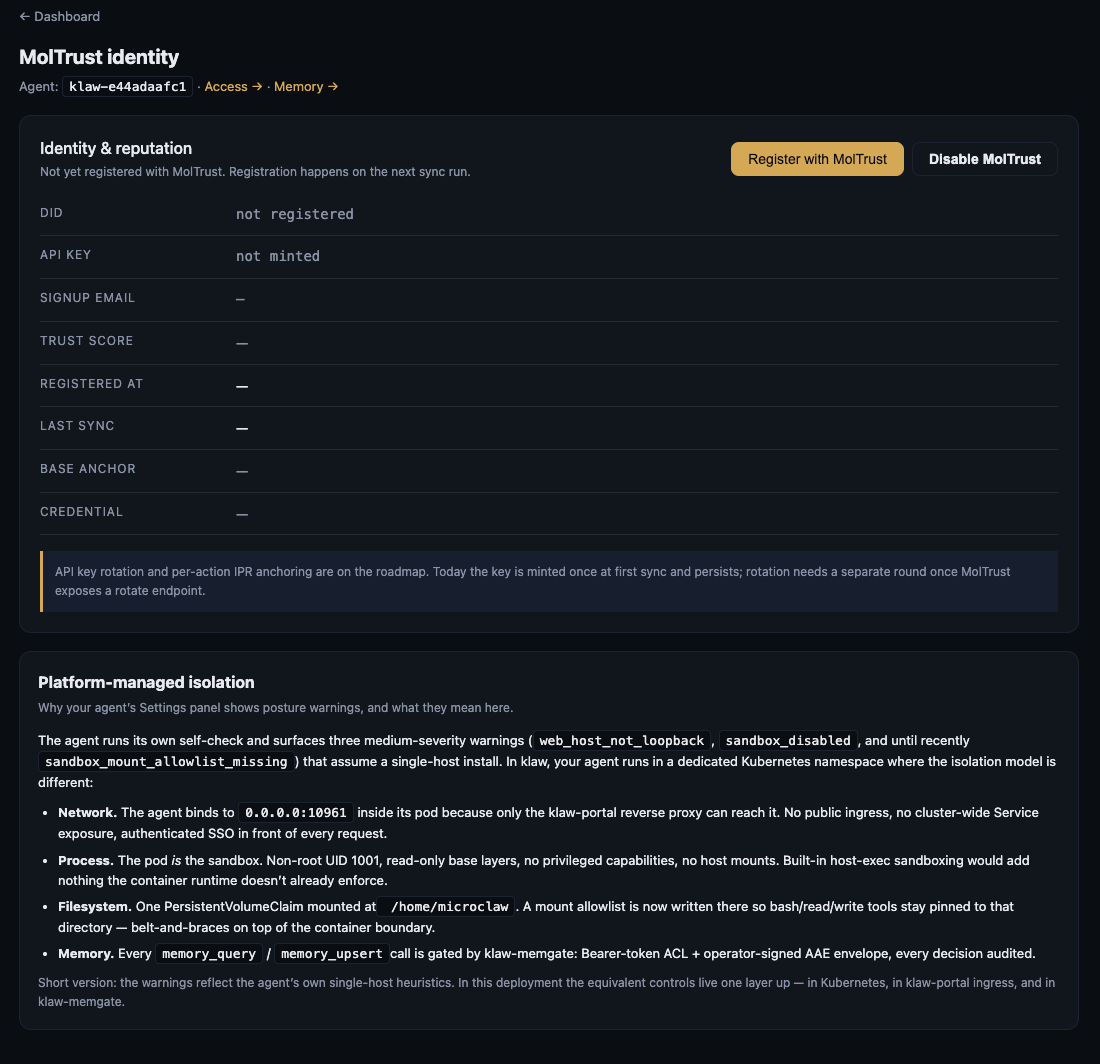
Identity & reputation
- DID —
did:moltrust:<hex>. Your agent’s public, verifiable identifier. - API key — minted by MolTrust on first sync. Used by MolTrust-enabled peers to verify your agent’s signatures.
- Trust score — aggregate reputation from peer interactions. New agents start at Building until they accumulate signed interactions.
- Base anchor — a transaction on the Base L2 blockchain that permanently anchors the DID. Click the link to view on Basescan.
- Credential — verifiable credential issued by MolTrust, used in AAE envelopes (see section 6).
- Register / Disable — the registration is owner-initiated so you can keep an agent private. Disable MolTrust is a kill switch; disabling blocks any further MolTrust-verified traffic to this agent.
Platform-managed isolation
The second card on the Trust tab explains why the agent’s own Settings panel may surface medium-severity warnings (web_host_not_loopback,sandbox_disabled) that assume a single-host install. In ownify, the equivalent controls live one layer up:
- Network. The agent binds to
0.0.0.0:10961inside its pod because only the klaw-portal reverse proxy can reach it. No public ingress, authenticated SSO in front of every request. - Process. The pod is the sandbox. Non-root UID 1001, no privileged capabilities, no host mounts.
- Filesystem. One PersistentVolumeClaim at
/home/microclaw. A mount allowlist pins bash / read / write tools to that path. - Memory. Every
memory_query/memory_upsertcall is gated by klaw-memgate — Bearer-token ACL plus an operator-signed AAE envelope. Every decision is audited.
5Memory — your agent’s knowledge
Each agent has its own memory palace — a structured, searchable store organised into wings (top-level scopes) and drawers(individual memories). The Memory tab is the browsing UI.
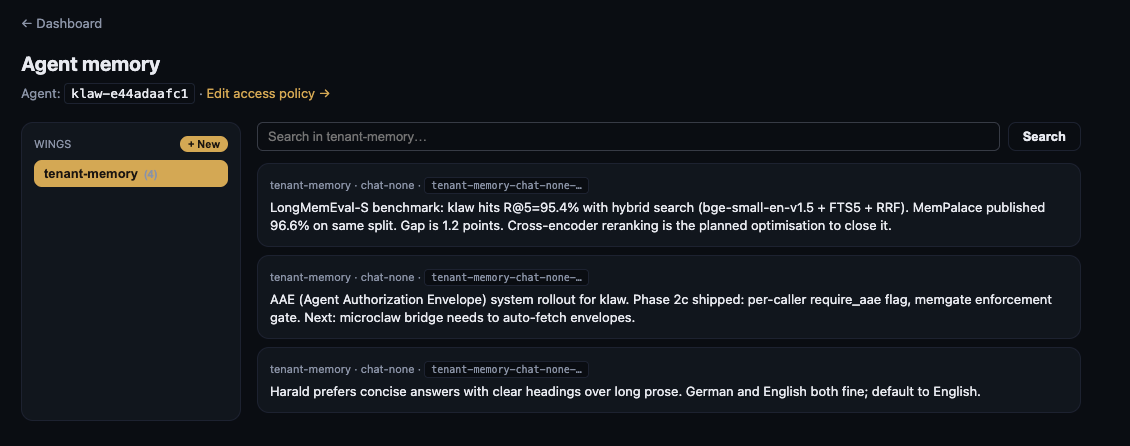
- Wings —
public,shared,private,security,diary, andtenant-memory(the default wing the agent writes to). Create additional wings with + New. - Drawers — atomic memory items. Each shows wing · room · sub-scope and the first line of content. Click any drawer to view / edit in full.
- Search — semantic search across the currently selected wing. Results rank by relevance, not recency.
- Edit access policy — the link at the top takes you to the Access tab (section 6) where you control which callers can read, write, or delete which wings.
6Access policy — who can touch what
Memory access is deny-by-default. You grant scopes explicitly by caller —operator (you), bot (the agent itself), plus any channels or external peers you choose to add.
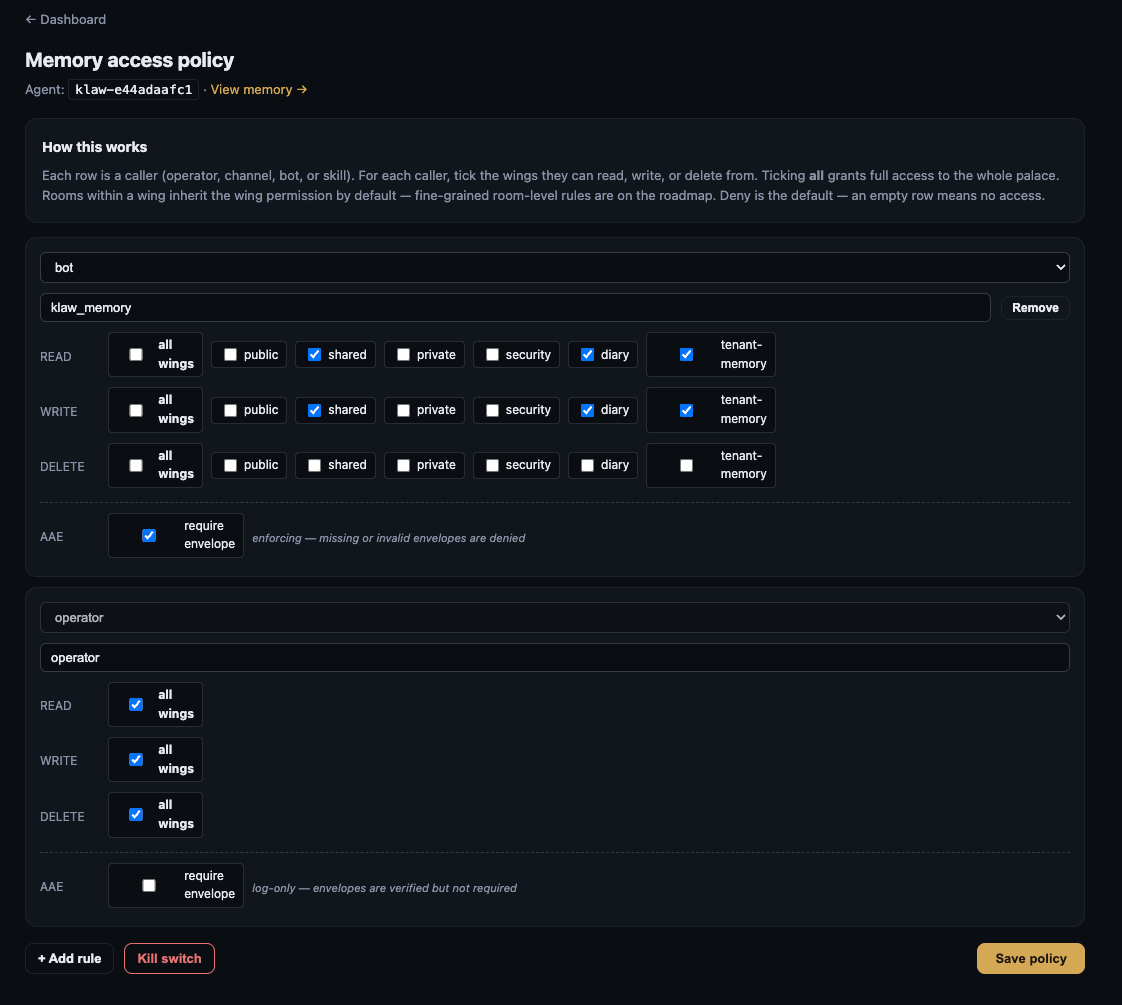
Rules
- Each row is a caller. Tick the wings they can read, write, or delete from.
- all wings grants full access — useful for the operator row.
- Rooms within a wing inherit wing permission today. Fine-grained room-level rules are on the roadmap.
- Empty row = no access. The agent bot starts with sensible defaults (
shared/diary/tenant-memory).
AAE envelopes
The require envelope checkbox toggles between two modes:
- log-only — envelopes are verified if present but not required. Good for rolling out AAE without breaking existing callers.
- enforcing — missing or invalid envelopes are denied. The agent bot’s own memory ops run in this mode by default because the bridge auto-fetches operator-signed envelopes for every call.
7Audit — every memory decision, logged
Every ACL decision from klaw-memgate lands here within seconds. Auto-refreshes every 10 s.

- Decision —
allowordeny. Totals shown at the top of the page. - AAE —
AAE ✓means the caller presented a valid envelope signed by the operator; blank means no envelope was attached. - Reason — populated for denies:
no rule(no matching ACL row),aae required: no envelope(enforcing mode, envelope missing), scope violations, etc. - Useful for debugging integration errors, compliance exports, and detecting credential issues early.
8Egress — outbound message screening
Counterpart to the Audit tab. Section 7 records what came into your agent’s memory; this tab records what your agent tried to send out. Every outbound text message — Matrix, Signal, Telegram, A2A reply — is scanned by the klaw-egress-scanner for tokens, JWTs, PEM private keys, internal cluster paths, and YAML secret signatures, before the channel adapter sends it.
- Open it via Audit → Egress → on any agent, or directly at
/dashboard/agents/<slug>/egress. - Action badge per row —
allow,redact(substring replaced inline),refuse(message blocked),alert(blocked + operator notified). - Hits — which pattern classes matched (
token,jwt,secret-yaml,internal-path,private-key,high-entropy) and how many times. Hover for the SHA-256 prefix of the matched substring. - Length — original size, plus post-redaction size when redaction shrank the body.
- Body hash — SHA-256 prefix of the full message, for cross-correlation. Sample matches and message bodies are never persisted in clear — only their hashes.
- Auto-refreshes every 10 s. Owner-scoped — only the email that owns the agent can read it.
Deep-dive doc with the full pattern set and policy explanation: Egress DLP →.
9Using your agent
Open agent → on the dashboard takes you to <slug>.ownify.ai, the agent’s own chat UI.
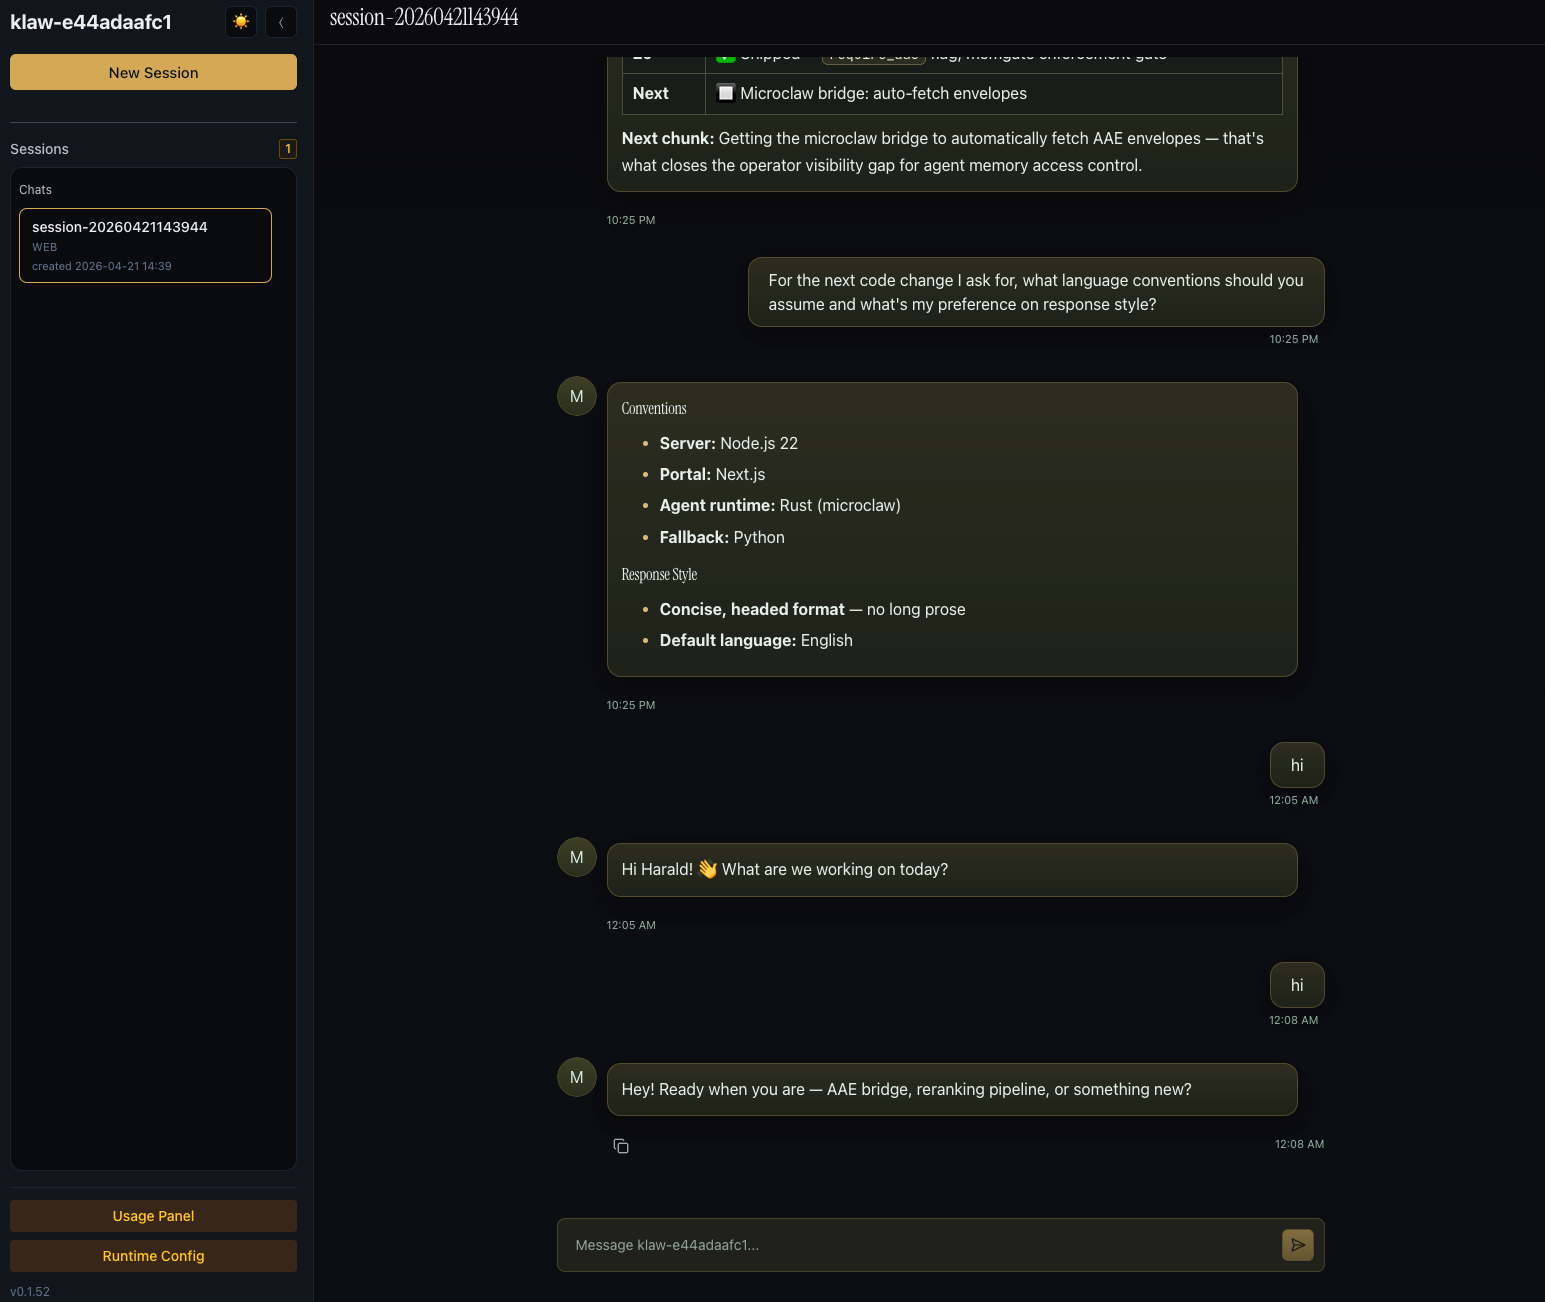
- New Session — starts a fresh conversation. Sessions are persisted and resumable.
- Chats — history of past sessions on the current channel. Click to resume.
- Message box — standard chat input. The agent can call tools (web search, memory query, file read/write, code exec, etc.) — tool results render inline.
- Usage Panel — live per-session token / cost breakdown.
- Runtime Config — quick runtime settings (model, temperature, tools enabled). Full settings panel is in section 9.
- Version is shown at the bottom left (
v0.1.52) so you know which agent-runtime build you’re on.
10Agent settings
Inside the agent UI, the full Settings panel is where you configure channels, runtime defaults, model, skills, and integrations. Changes save to the agent’smicroclaw.config.yaml; most require a restart (use the Restart agentbutton on the ownify dashboard).
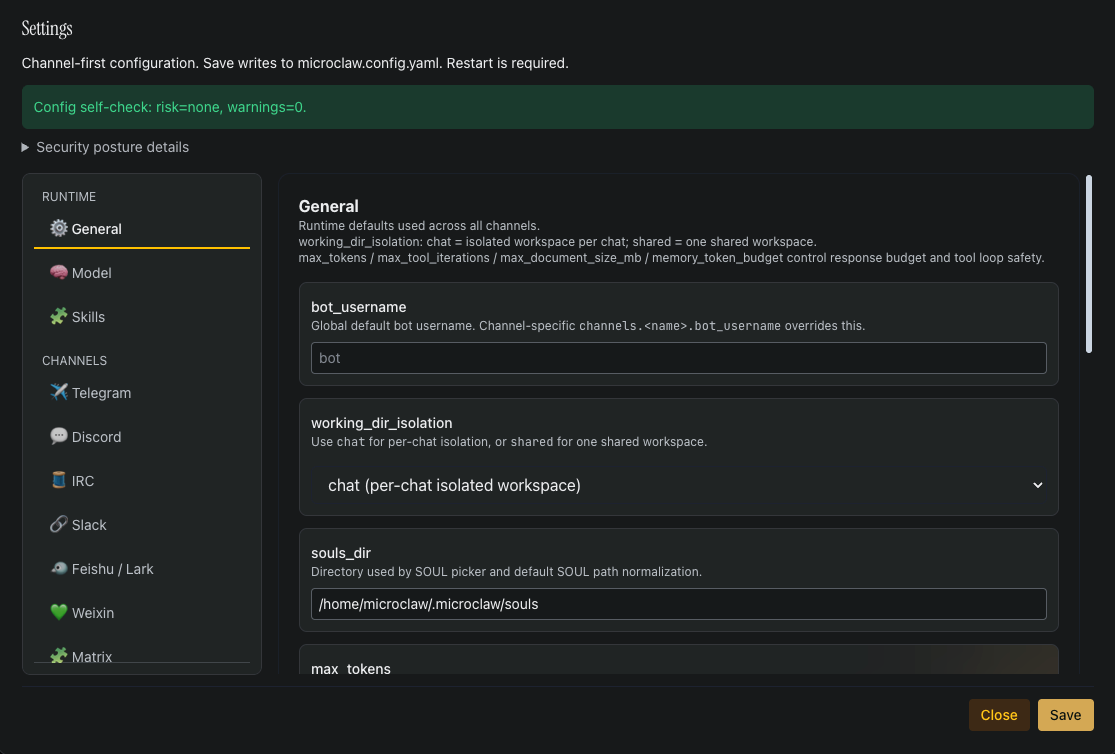
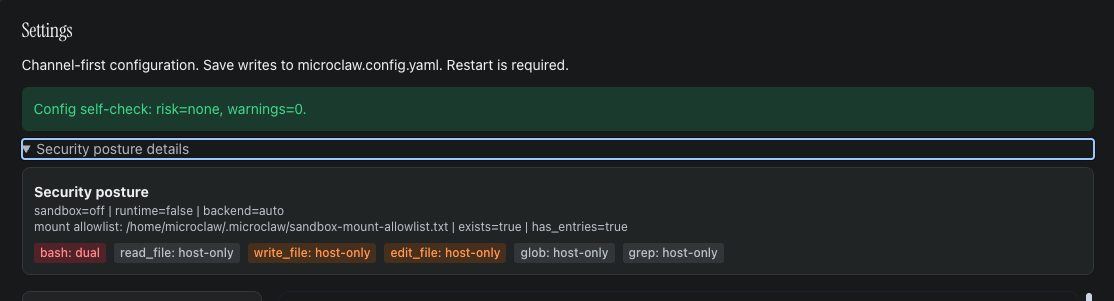
Config self-check
The banner at the top of Settings summarises posture. In a healthy ownify deployment you should see risk=none, warnings=0. Expand Security posture details to see the active sandbox / runtime / backend state and the per-tool access mode (host-only vs dual).
If it goes yellow or red:
- high / memory_provider_primary_failures_high — your agent failed 3+ consecutive memory calls. Usually transient; resolves when the memory backend recovers or on agent restart. Check the Audit tab for the underlying reason.
- medium / sandbox_runtime_unavailable — only seen if you enable sandbox mode in a deployment that doesn’t have a container runtime. Not applicable in ownify.
- medium / otlp_* — observability export misconfiguration. Only triggered if you enable OTLP export.
Two warnings (web_host_not_loopback, sandbox_disabled) are suppressed in ownify because they assume a single-host install and don’t reflect the real posture — the Trust tab (section 4) explains the platform-managed isolation model.
Settings overview
The left rail of Settings lists every channel adapter the agent supports: Telegram, Discord, IRC, Slack, Feishu / Lark, Weixin, Matrix, iMessage, Email, Nostr, Signal, DingTalk, QQ, plus the built-in Web and Access / A2A integrations. Runtime settings (General, Model, Skills) sit at the top of the same sidebar.

Runtime defaults
General is where agent-wide defaults live. Every field has inline help; the highlights:
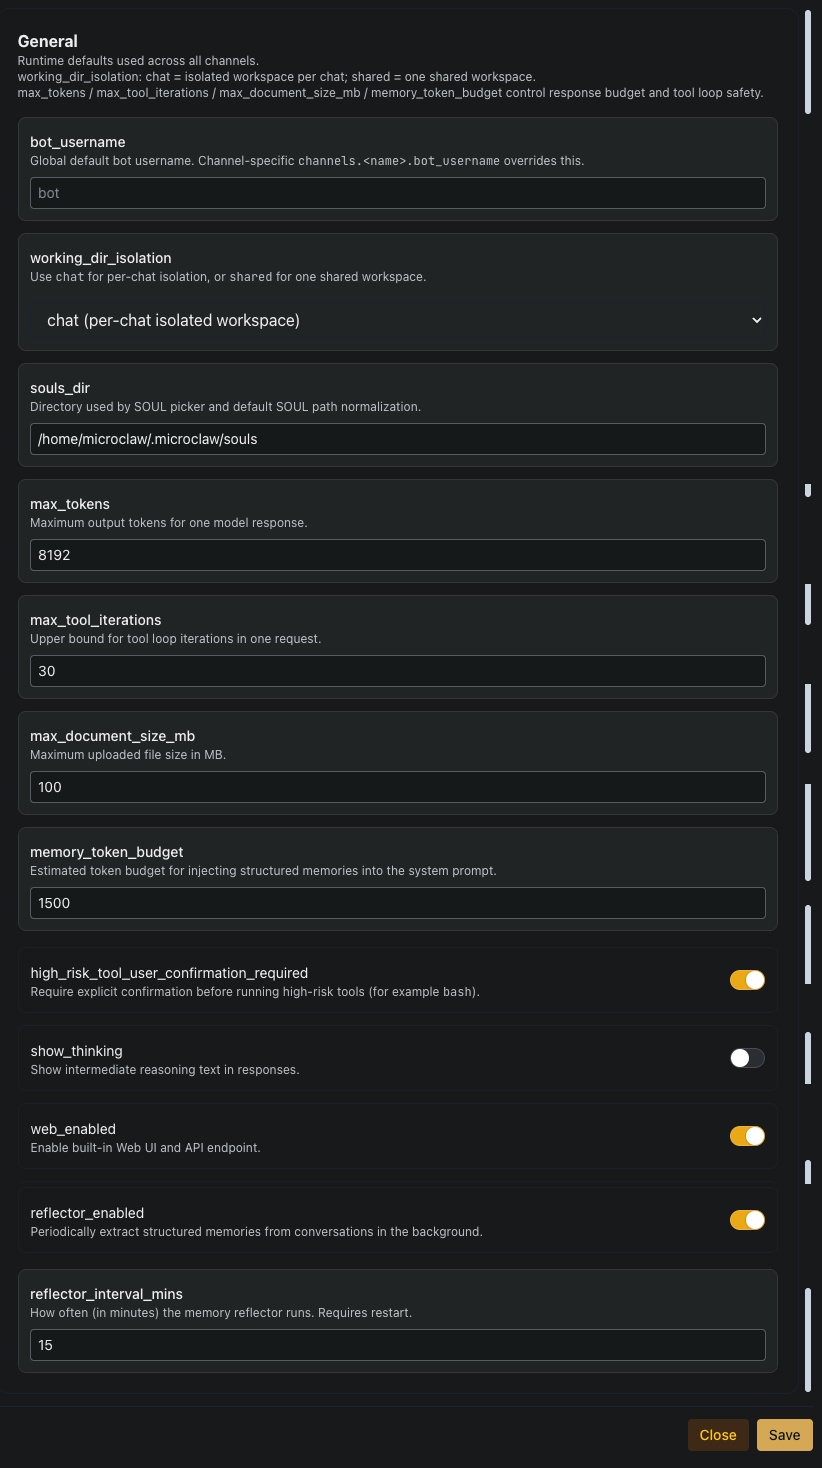
- bot_username — default bot name across channels. Each channel can override.
- working_dir_isolation —
chat(isolated workspace per chat — recommended) orshared(one workspace across all chats). - souls_dir — directory used by the SOUL picker and default SOUL path normalisation.
- max_tokens / max_tool_iterations / max_document_size_mb / memory_token_budget — response and tool-loop safety limits. Defaults are conservative; raise only if you understand the cost implication.
- high_risk_tool_user_confirmation_required — on by default. Requires explicit confirmation before the agent runs high-risk tools like
bash. - reflector_enabled / reflector_interval_mins — the background memory reflector periodically extracts structured memories from conversations. Interval changes require a restart.
Model & provider profiles
The Model tab has three sections: the global mainprofile, a list of reusable LLM provider profiles (cloned / deleted / added as needed), and an Embedding block for semantic memory.

- Global main profile — the default every channel and skill falls back to.
llm_provider+model+api_keyare the minimum. ownify injects a platform-minted LiteLLM key, so leaveapi_keyblank to keep the managed one. - LLM provider profiles — reusable named configs you can point channels or bots at via
<channel>_provider_preset. Typical pattern in ownify: one profile per model tier (e.g.glmfor cheap / fast,kimifor higher-capability), all routed through the internal LiteLLM proxy. Clone forks an existing profile; Delete removes one that’s no longer referenced. - llm_base_url — leave as
http://litellm.klaw-llm.svc.cluster.local:4000/v1unless you know what you’re doing. This keeps all LLM traffic inside the cluster and under per-tenant budget enforcement. - show_thinking — per-profile toggle for exposing the model’s reasoning trace when that profile is selected. Off by default.
- Embedding — only set if you want to override the platform default for semantic memory. Requires a sqlite-vec–capable runtime.
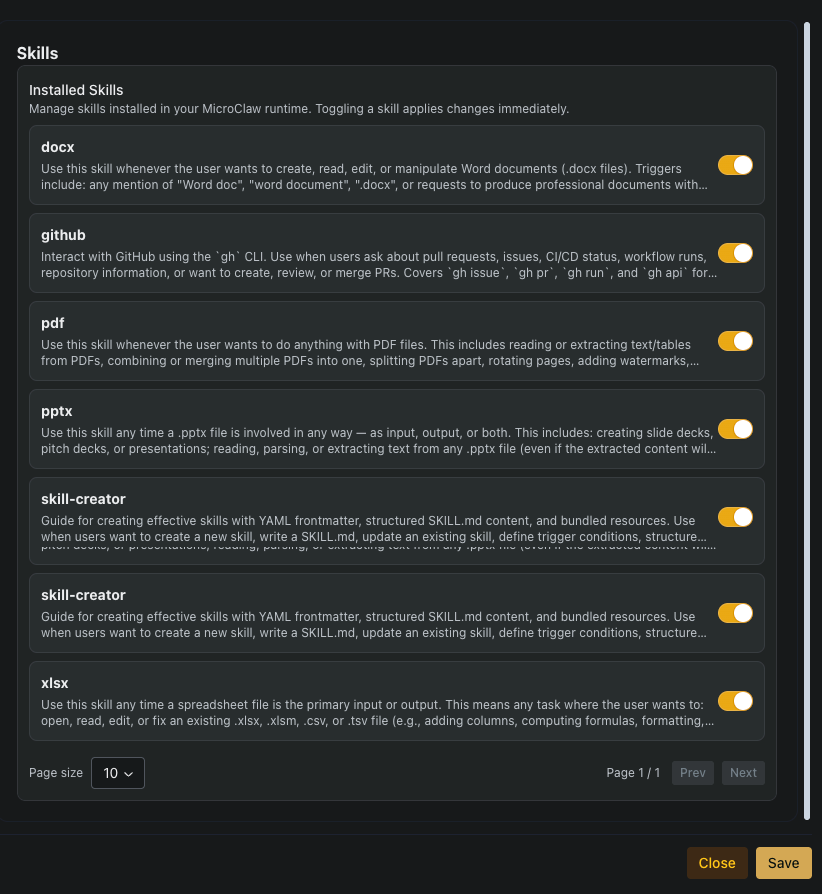
provider_preset), not override the model directly. Profiles are reusable, testable, and keep the main config readable as you add more bots.Skills
The Skills tab lists every skill installed in the agent runtime. A skill bundles a prompt, trigger conditions, and any resources the agent needs for a specific capability (e.g. document handling, repo operations, presentation creation). Toggle a skill on or off to change which capabilities the agent can use; changes apply immediately. The list is paginated.
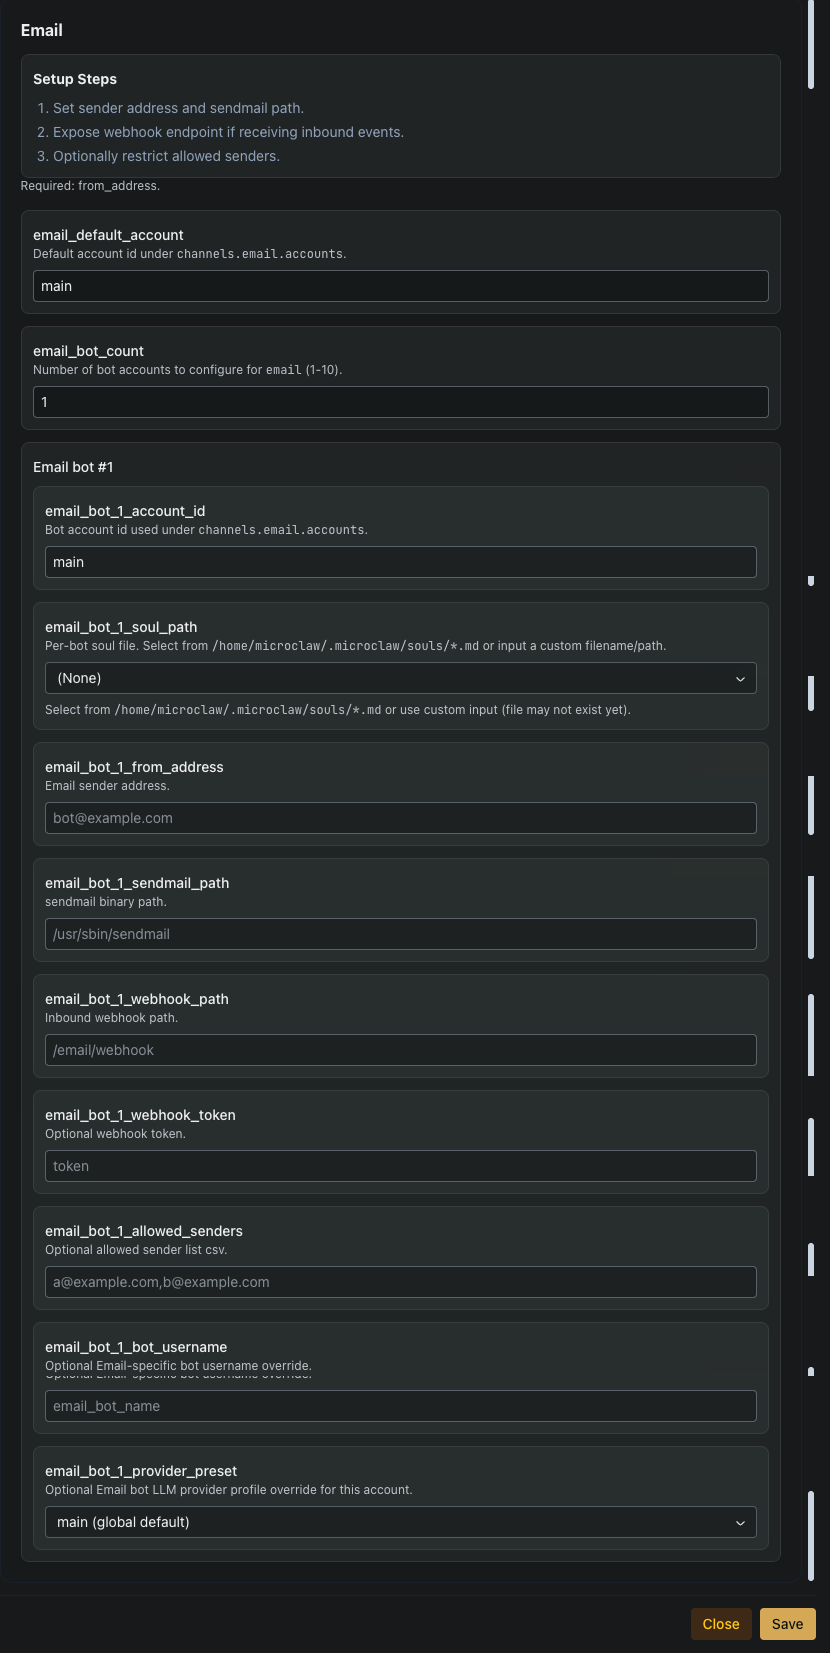
Channels
A channel is how the outside world talks to your agent — Telegram, Discord, Slack, Email, IRC, Matrix, Signal, and so on. Each adapter has its own tab under the Settings sidebar. ownify runs the agent runtime and platform; channels are the bridges to where your users already are.
Across every adapter the tab layout is the same:
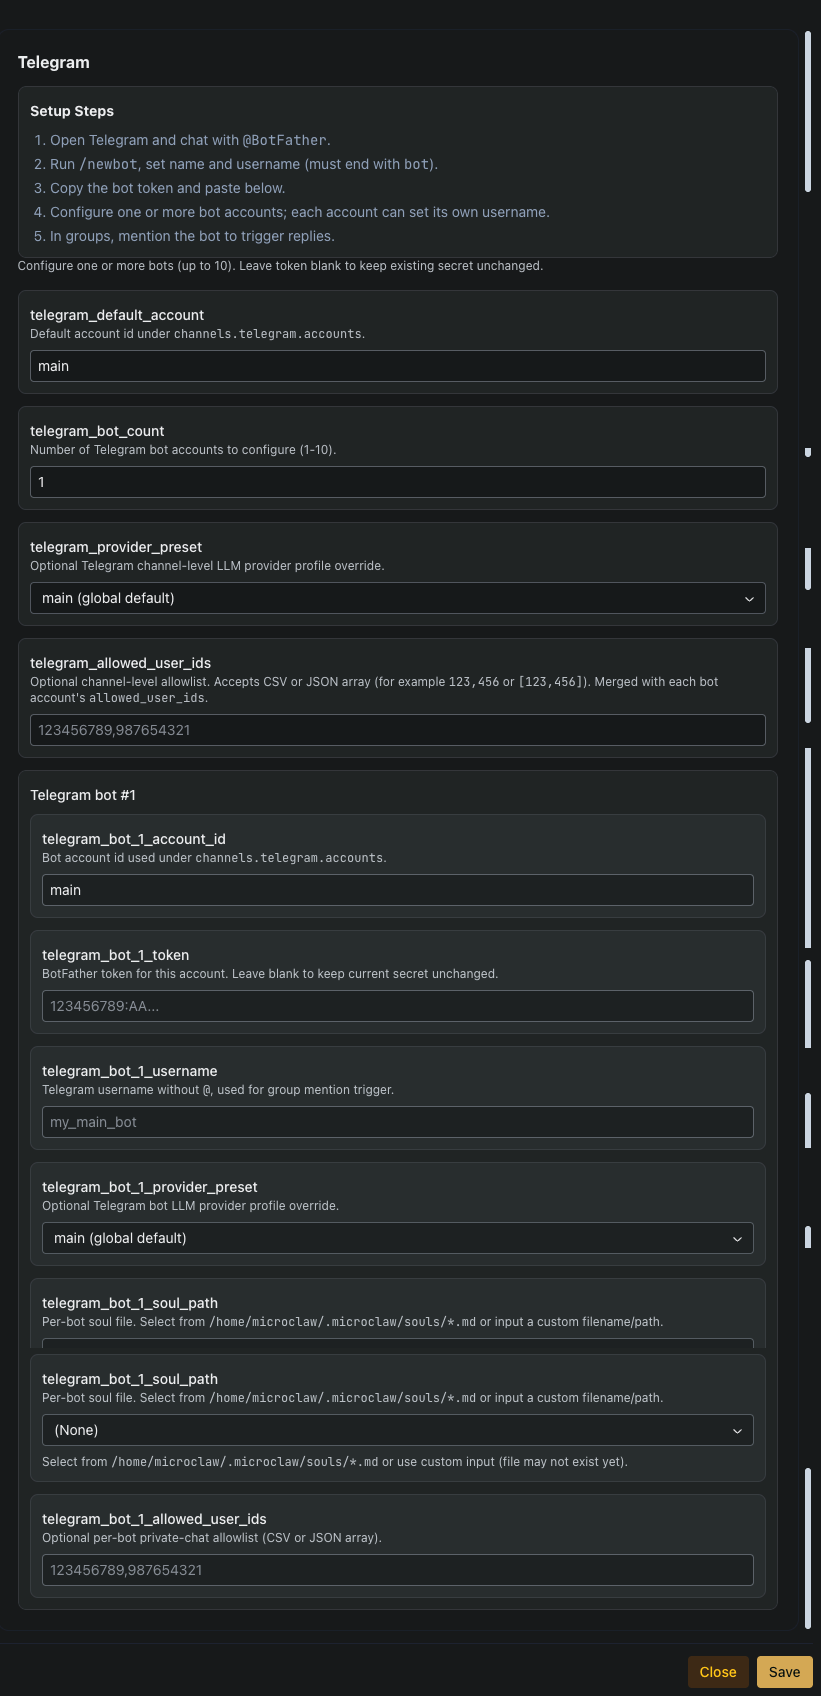
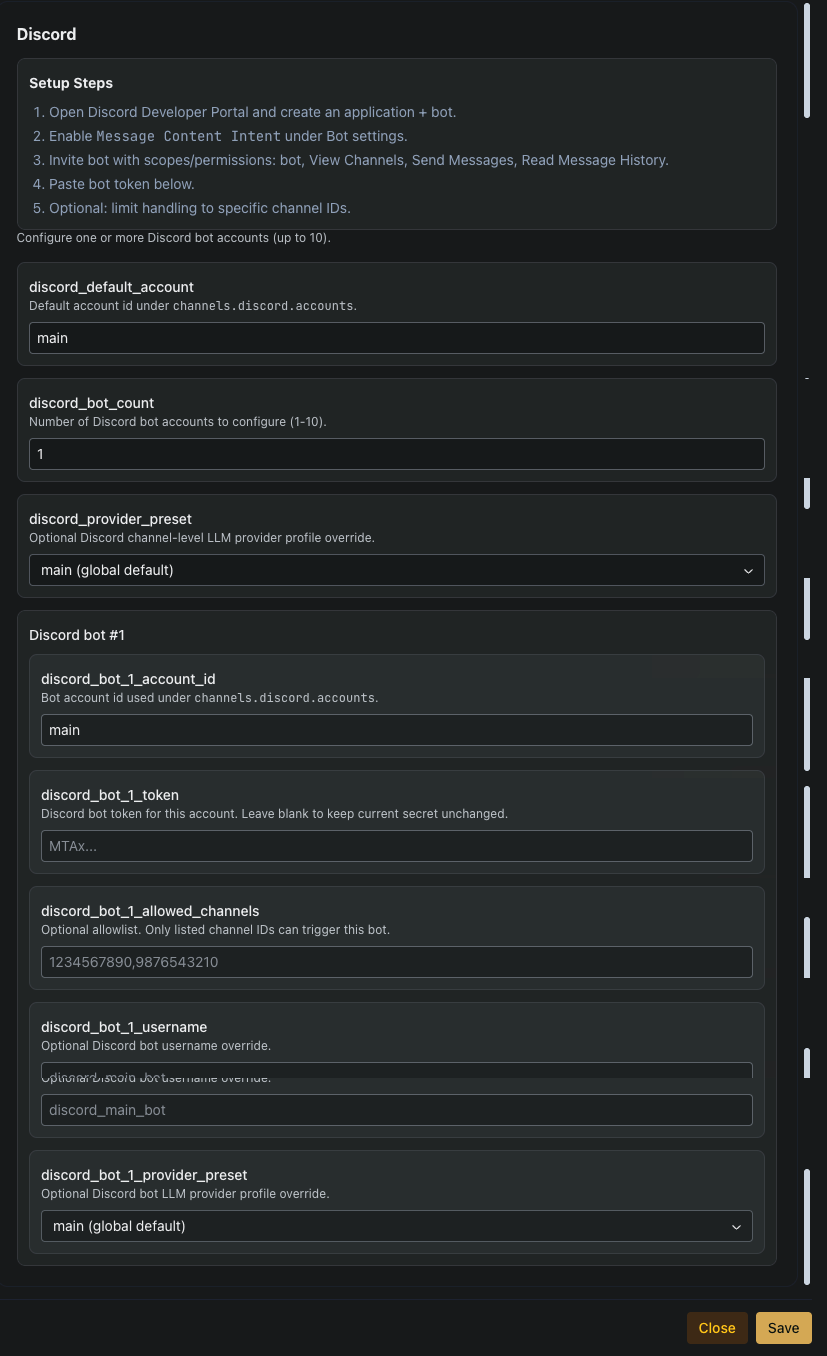
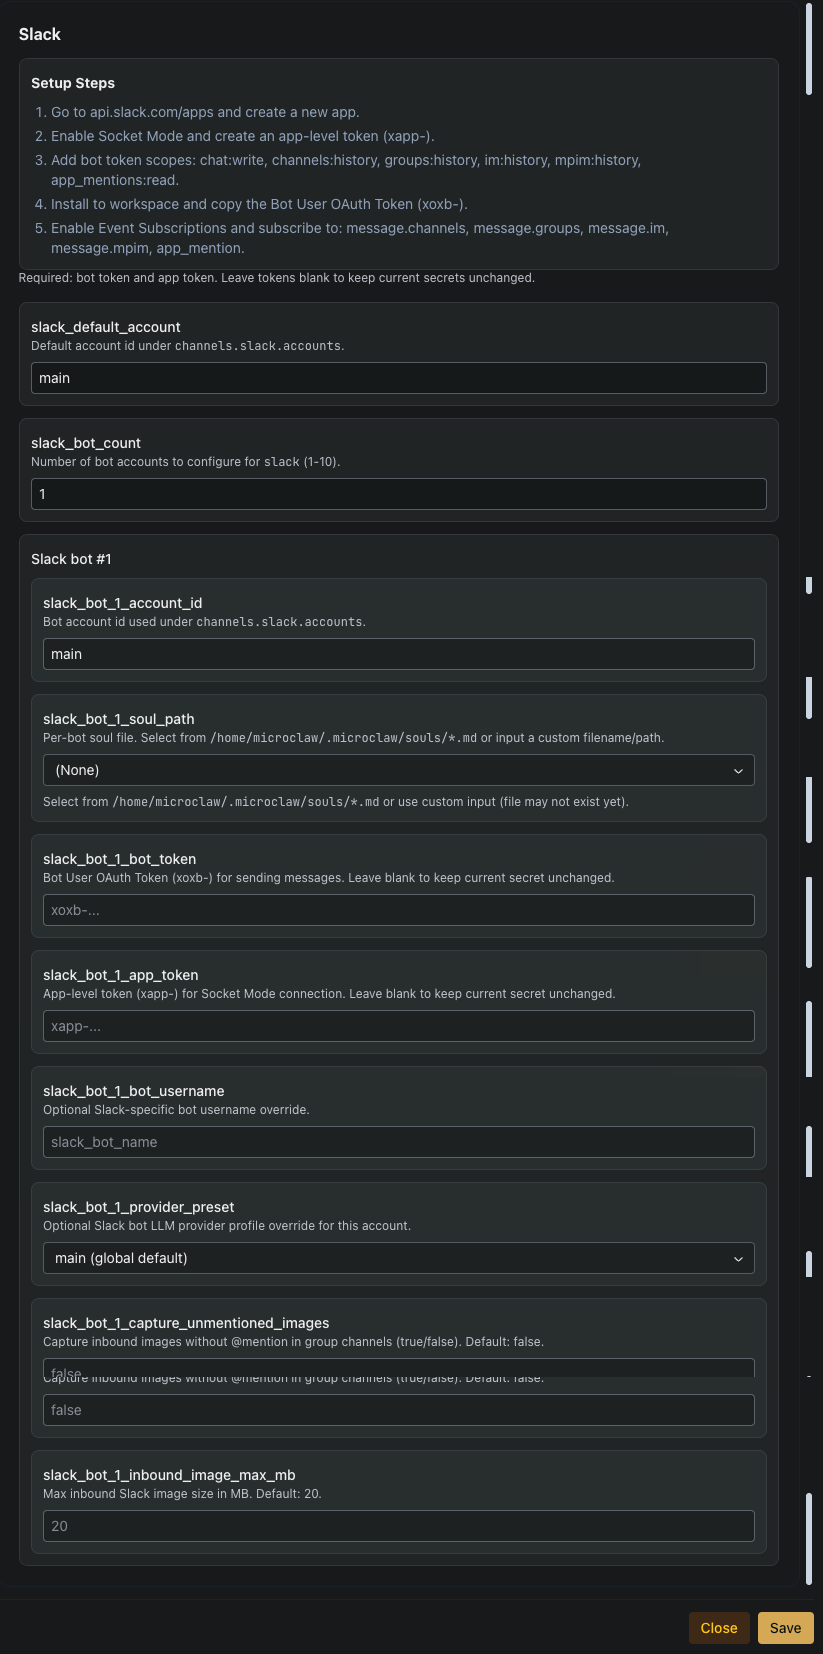
- Setup Steps — a short walkthrough for that platform (e.g. "chat with @BotFather, run
/newbot, paste the token"). Follow these before touching any fields. - Channel-level defaults — settings that apply to every bot on this channel: default account id, bot count (1-10), optional LLM provider override, and a channel-wide
allowed_user_ids. - Per-bot blocks — one block per bot account, each with its own credentials (token / password), username, SOUL file, provider override, and per-bot allowlist that merges with the channel-level one.
Shared field shapes you’ll see on most adapters:
<channel>_default_account— id underchannels.<channel>.accounts. Referenced by SOUL routing and downstream config.<channel>_bot_count— how many bots to render blocks for (1-10). Raise before configuring bot #2, etc.<channel>_provider_preset— optional LLM provider override at channel or bot scope; otherwise inherits the global main profile.<channel>_allowed_user_ids— privacy allowlist. Accepts CSV or JSON array. Channel-level and per-bot lists merge.<channel>_bot_N_soul_path— SOUL file from/home/microclaw/.microclaw/souls/*.md. Lets two bots on the same channel behave differently (different persona, different skill mix).
Click through the adapter shapes below. The visual pattern is the same; the credentials you need to paste are what differs.

Other adapters (Matrix, Signal, iMessage, Nostr, DingTalk, QQ, Feishu / Lark, Weixin) have their own tabs following the same shape. See each adapter’s own Setup Steps for platform-specific credentials and quirks.
11Chat your agent over Matrix (E2EE)
Every ownify agent is reachable as an end-to-end encrypted Matrix bot with the MXID @ownify-<slug>:ownify.ai. Matrix is the recommended channel when you want encryption + a rich multimodal chat experience (images, documents, voice — all decrypted client-side).
One-click connect via ownify’s own Element
On the dashboard, expand the 🔒 Matrix chat (E2EE) disclosure on your agent’s card and click Open chat →. That opens ownify’s self-hosted Element Web at element.ownify.ai — the homeserver is already configured, the only sign-in option is Continue with ownify (Zitadel), same account as the portal. No homeserver picker, no extra password, no matrix.org detour.
Prefer a different Matrix client? The secondary Use another client →button gives you the matrix.to link — works with Element Mobile, Cinny, FluffyChat, SchildiChat, Nheko, or anything else that speaks Matrix.
Owner-only — nobody else can message your bot
Your bot’s allowed_user_ids allowlist is populated at provisioning time with your own Matrix ID (derived from your ownify account email). Inbound messages from any other Matrix user — even on your homeserver, even over federation — are silently dropped by the channel adapter before the agent sees them. No token spend, no leaked context.
To add a teammate, add their MXID to the allowlist via the agent’s Settings → Matrix tab (or edit channels.matrix.accounts.main.allowed_user_ids directly in the config), then restart the agent.
What works in the Matrix channel
- End-to-end encryption — olm/megolm via matrix-rust-sdk. The ownify homeserver never sees plaintext.
- Image understanding — attach a photo, the bot decrypts it, passes pixels to the vision-capable LLM, and responds to what’s in the image.
- Documents — .docx, .xlsx, .pptx, .pdf and friends arrive with the correct MIME type so Element shows them as proper Office icons, not “file.bin”.
- Typing indicator — you see “@ownify-<slug> is typing…” while the agent works.
- Federation — the homeserver delegates via
ownify.ai/.well-known/matrix/server, so other Matrix servers can discover and federate with you on the short domain.
Device verification (one-time)
The first time you DM your bot, Element may show a yellow “unverified device” warning. The bot publishes cross-signing keys on every boot, so you can resolve the warning by clicking your bot’s device in Element and doing a SAS emoji compare (or “trust-on-first-use”). Cosmetic — messages are fully encrypted regardless.
12Billing & usage
The Billing button (top-right of the dashboard) opens the Stripe-backed billing portal — subscription, invoices, top-up credits, payment methods. Live usage is shown on the dashboard summary and in the per-agent card; hard limits come from LiteLLM so you can’t accidentally overspend.
- Pricing matrix → — plan tiers and what each includes.
- Your billing portal → — manage subscription + wallet.
This guide is best-effort and will drift as ownify evolves. If a screen looks different from the screenshots here, the code is authoritative — open a ticket at support@dsncon.de or check the docs index for more specific references (MolTrust, pricing, API).